Double duty - Programming the 2501+220
29 Feb 2016 (updated 28 Feb 2017)
The 2501+220 is available on amazon.com
With this entry, I will cover 2 points (thus the "double duty" terminology in the title): first being creating my own programming cable; and second being the software aspect, both topics should be the same process for all 3 models including the two UV2501's and the UV5001 (the 2501 is dual band 144/440, 2501+220 is tri band so they are essentially 2 different models).
Programming cable
When it comes to the programming cable, it is recommended if you buy one, to stick with one that has the FTDI chip in it for quality, compatibility and stability. There are various cables out there that are genuine Prolific chip, and fake prolific chip (but still uses the Prolific drivers), as well as genuine FTDI and fake FTDI (the fakes are subject to getting bricked by newer drivers making it useless). BTech (aka BaofengTech) sells the official programming cable that is compatible with all 3 of these mobile models and makes use of the FTDI chip.
In my case, I already had an alternative option available. Some months back I picked up several CP2102 USB to Serial adapters on ebay (more commonly used for Arduino projects). When I got them, they were $1.63 each plus $1.98 S&H from China. Due to their popularity, many of these listings are selling out of them quicker and the price has gone up some, most recent check of similar or the same items shows the price now at $1.39 (without ribbon cable) to $2.38 each (with ribbon cable) plus shipping. I do see a few 2 pack sales (with ribbon) for $4.48 with free shipping. Some do not include the little ribbon cable, and after making my own programming cable, I strongly recommend buying one with that little ribbon cable. Still, at this price point, it would be worth it to pick a few up for various other projects. The only down side is waiting a month or so for it to arrive from China, versus the official cable should arrive in just a few days. Your option is $20+ for use in a few days or under $5 to arrive a few weeks later (but having the satisfaction of knowing you made something yourself). That is what makes ham radio great!
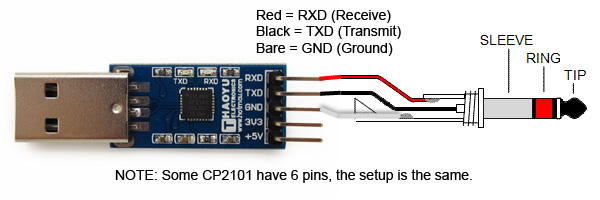
When it comes to making your own, the key is getting the pinout correct. I used a 8 foot stereo cable with 3.5mm male on one end (other side didn't matter as I cut it off), I primarily chose 8 foot because most of the 3-4ft cables just seem too short without having to move around the power supply or have the radio in very close proximity. That extra few feet makes a BIG difference.
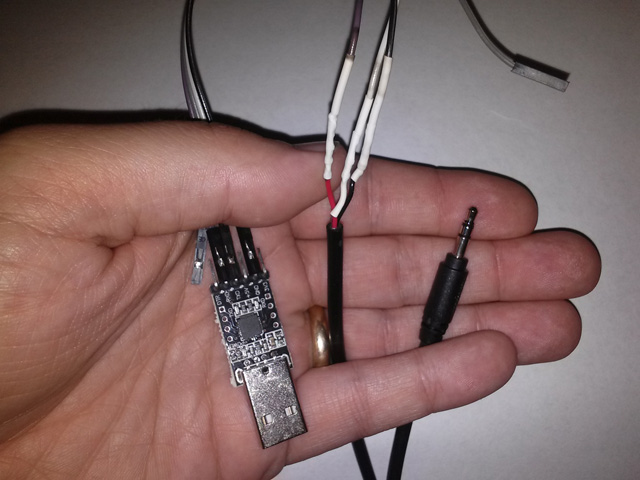
So what I did was cut one end off the standard stereo cord, and used a multimeter to check which wire went to which section on the tip. In my case it was Black wire to the tip, red wire to the center band, and bare wire to the long section closest to the plastic (aka ground). Then I needed the layout on the CP2102 side. After some digging and help from Facebook groups, they had some suggestions as to which wire going to where. After a little experimentation I found it works right away with black wire to TXD, red wire to RXD, and ground/bare wire to GND. After verifying it worked with the radio, I soldered the stereo cable wires to one end of the ribbon (after removing the black plastic pieces), and just used the included black square pieces to slide right onto the USB adapter side. I have read and written from/to the 2501+220 multiple times now and it has worked every single time.
Update Feb 2017: I have now used this cable with multiple BTECH mobile radios and it has never failed me. A few months ago I used my 3D printer to make a very simple small "case" for it, as well as some hot glue to hold the pins in place on the dongle side. It is thin enough where the little red light lights up that side of the case. I have also since learned that both the BTECH cable and this custom setup I made (and you can make) also works with various TYT and QYT radios, such as the 7900 and 8900 (including the new "D" variants).
This brings me to the programming aspect.

Programming
Software and bugs galore
NOTE Feb 2017: Chirp has supported the BTECH models for some time now, so that is a much easier and stable option for these radios. The BTECH software is still available but not recommended, even BTECH has moved to the position of suggesting Chirp. I am keeping this below for those who choose to continue using the BTECH specific software.
Feb 2016 - For programming I used the only available option, the BTech software. As of right now this is the only option but I understand that the team behind Chirp is looking to support these models. The software can be downloaded from the miklor.com site here: UV2501+220 Software - Miklor.com. You simply download it (as a zip file), extract the contents, and open that new folder to double click to run the setup.exe. NOTE: The above linked software is ONLY good for the 2501+220 model, each model has dedicated specific software.
If you have the dual band UV2501 or the dual band UV5001, the software can be downloaded from this link (the same software works for both dual band models, only the 2501+220 model needs the different software due to the 220 capability). Another big side note is it is ONLY available for Windows. Mac or linux users will need to use some kind of compatibility program, and even then that will likely add another layer or bugs to a program that is buggy enough on its own.
Simply put, the programming software is bare minimum basic coding that is buggy and only works as long as you stick with just programming the channels. I have a 24" monitor (actually dual 24s) set to 1920x1080 resolution and as long as the main window is maximized, it is fine. As soon as the main windows is "restored down" to a smaller window, portions of it are off the right and bottom side of the screen. Trying to resize from the corners only moves the window, it doesn't actually resize it. The ONLY time I found it properly resizes is when I drop the resolution down to 1280x800. Anything higher or lower and it doesn't resize or move properly. At this 1280x800 resolution, it is the only one where it looks and acts properly.
The next issue is the bugs of the software within the smaller "internal" windows. Bugs and major annoyances I've noticed myself:
- USB programming cable needs to be plugged in BEFORE opening this software. Plugging it in after software is opened, you will need to find and correct the Communication port, the software will not correct it nor detect the USB programming cable if software is already open. You need to close the program, plug in the USB cable, then open the software again. It then (usually) picks up the proper port.
- The columns cannot be resized.
- The smaller window cannot be resized, only moved within the larger main window.
- The scroll in the smaller windows only "passively" scrolls, as in you move it down and the rows do not change appearance until the mouse button is released. Active scrolling would show the rows moving up as you bring the scroll bar down.
- When reading from previously programmed radio (using the Read button at bottom left), the first 4 entries (0 to 3) are always blanked out (frequencies show 0000000 and all other columns back to defaults, and CH-name blank). Using the read button from the top (the button under the channel menu), it reads properly.
- The "Optional Features" window has no mention of 220 anywhere.
- FM broadcast radio "channels" are useless, there is no way to go from "channel" 1 to 2, number or up/down button presses only change the displayed frequency.
- Almost everything needs to be entered manually, it will not detect nor use the offsets.
- When entering many UHF based frequencies with a Enc tone (but no Dec tone), the software many times automatically alters the column SigCode and Opisug. Example, I enter frequency 444.000, Enc tone 100.0, and automatically the software changes SigCode to 9, and Opisug changes to 5TONE (for just this row). You need to change them back to 1 and OFF before continuing.
- As previously mentioned in my review, the 220 "click" is very annoying, especially if you have one set with TDR on, or a 220 frequency saved in a channel and it is scanning. In the software, Scan_Add: OFF disables showing that frequency/channel while it scans the channels. Manually selecting that channel it will still display and work normally.
As we can see, this is a pretty stout number and severity of bugs. The software is useful as long as you avoid messing with (or correct) the buggy aspects. Next we will go into actual use of the software.
Software descriptions and use
Below I will go over the various items and options.
First will be the top menu items.
- File: New, Open, Save As, Exit (all self explanatory).
- FM-Radio: Opens FM Radio information sub-window.
- Channel: Opens Channel Information sub-window.
- Option: Opens the Optional features sub-window (aka the items otherwise available via the menu on the radio itself, plus a few extras like Power On message).
- Signal: DTMF, 2TONE, 5TONE, opens the selection specific tone sub-window (not used with ham radio).
- Program: Read from Radio, Write to radio (self explanatory).
- PassWord: Allows changing of the read/write specific password, required for Part 90 use. This is used to keep someone else from using software on their computer to change the programming. Not needed for ham radio.
- Communication: Selects which COM port your USB programming cable is connected to.
- Exit: Closes the program.
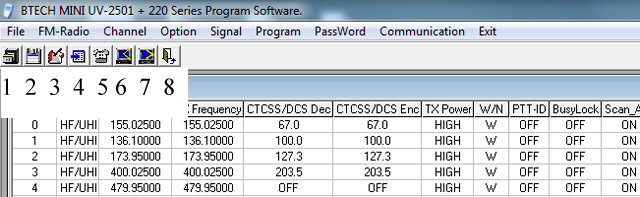
Next is the "buttons" which I have added the numbers in the above screenshot.
- 1. Open file
- 2. Save current sub-window settings to a .dat file
- 3. Optional Features sub-window
- 4. Channel Information sub-window
- 5. DTMF code sub-window
- 6. Read from radio
- 7. Write to radio
- 8. Exit
These all correspond to certain menu items previously mentioned, BUT the annoying part is there is no "tooltip" displayed when holding the mouse on top of each button so aside from clicking it, there is no way to know for sure what they do. Some are obvious like Save (disk icon), Read from (arrow to PC), Write to (arrow from PC), and exit (arrow out the door), but the others are cryptic icons.
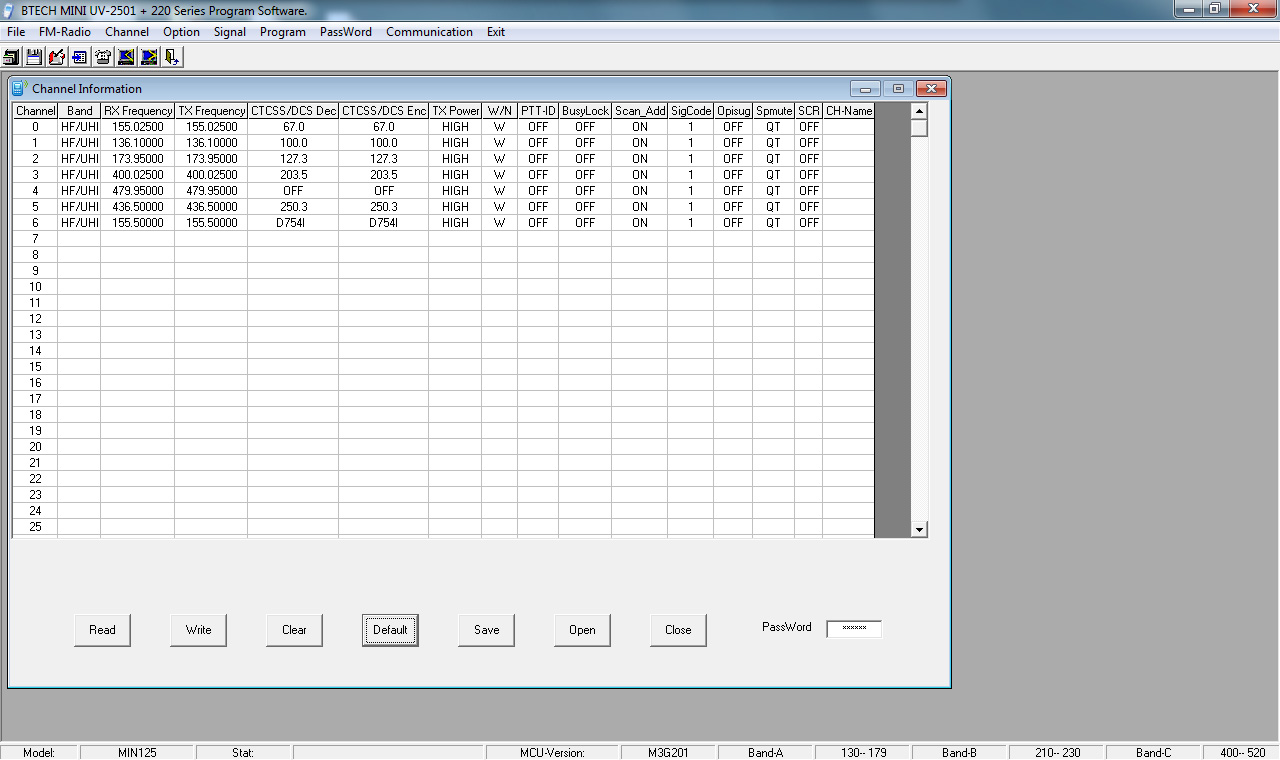
Then the meaning behind the column headers. Many of these associate with specific menu items in the radio, so please look at the manual for those mentioned here.
- Channel: self explanatory, the channel number here corresponds to the channel number once programmed into the radio.
- Band: always VHF/UHF, no other options.
- RX Frequency: Receive frequency (commonly shown on repeater listings)
- TX Frequency: Transmit frequency (example: if repeater listings show 147.000 +0.6, this TX Frequency would need to be 147.600)
- CTCSS/DCS Dec: tone decode, receive tone, sometimes called tone squelch where a tone needs to be received to open the squelch. For amateur radio, the only time this is typically used is dual mode Yaesu Fusion repeaters that transmit a tone on their analog signal (since digital does not transmit the tone, and without this "Dec" entry, you would hear the digital "buzzing" from the Fusion repeater.
- CTCSS/DCS Enc: tone encode aka transmit tone, typically used to "open" repeaters.
- TX Power: Transmit power, HIGH = 25W, LOW = 10W.
- W/N: Wide or narrow band frequency. In some larger cities they use narrow band, but smaller town or more remote areas (like my area) typically use Wideband.
- PTT-ID: Only used in conjunction with tones or commercial Part 90 use (which doesn't matter since this radio is not Part 90 approved)
- BusyLock: If frequency is in use, ON = disables transmit, OFF = allows transmitting anyways.
- Scan_Add: When SCAN is pressed on the mic keypad, ON means it is one of the channels it includes in the scan, OFF = excluded from the scan (I typically use OFF for 220 frequencies due to the click).
- Sigcode: Signal code, only used with Part 90 systems (which doesn't matter since this radio is not Part 90 approved)
- Opisug: Optional signaling, DTMF, 2TONE, 5TONE (menu 20).
- Spmute: Speaker Mute unless tone alone/and/or signal code is received, associates with Menu 21.
- SCR: I honestly have no idea what this one is, if you know, please email me. I've always kept it off which is default.
- CH-Name: Channel name, limited to I believe 6 or 7 alphanumeric characters (letters or numbers only)
Now for the simple buttons at the bottom of most sub-windows.
- Read: Reads settings from radio and fills into current sub-window. If you read while on Channel information, it enters the information from the radio (with the above mentioned bug, so I suggest not using this button).
- Write: Writes info from that sub-window into the radio. If you changed something in the FM-Radio sub-window, it will not affect the settings or regular channel information settings.
- Clear: clears all displayed info
- Default: This is supposed to revert all displayed settings to their defaults, another bug is something on channel information, it keeps the previously entered channel names (CH-Name).
- Save: self explanatory.
- Open: Self explanatory.
- Close: Closes just that specific sub-window.
That is the overall rundown of each and every option and menu item found in the BTech software. While frequency entry is slow and cumbersome via manual entry, the software as it is now due to the bugs is only minimally faster. This is why I am hoping that the people behind Chirp get their compatibility for these 3 models released as soon as possible. I have already reached out to them and let them know I am willing to help in any way I can, either sending my .dat file, or testing their software before final release.
Hopefully this helps and feel free to contact me if you have any questions or comments.
73 de K4ISR